
There are a number of technologies and platforms available to assist with the process of website migration from one server to another. It’s unfortunate, that even with the existence of such a plethora of tools, the average user will experience periods of downtime while completing (or attempting to complete) the transfer process. There are additional factors that come into play that are not so visible. For instance, transfer speeds for the DNS servers to update from the old to new host may have downtime of somewhere around 12 – 72 hours once the request to change has been submitted to the new provider. The process of transferring a website to a new host server may cause a site to experience up to 24 hours of inactivity as files, databases and configurations are set up on the new host server and validated. Although, it does not have to.
However, as we all have come to understand with the greatness that is the open source market, tricks and resources exist to help avoid a natural disaster during this process. The information following is fairly straightforward and easy to do as long as the developer has a general knowledge of cPanel/Plesk, IP addresses, and detailed FTP login practices. This will ensure they are able to work with the new web hosting plan’s configuration before DNS is altered and transferred to the new host provider’s server.
The ultimate goal for any website administrator is to ensure this process is accomplished with the customer being completely unaware of what’s going on behind the scenes. Multiple factors will dictate a more defined process such a hosting provider, server type and software configurations. The goal of the following is to provide a working framework to base the migration on.
Let’s dive right in.
Step 1: Website Migration Planning
There are a few pre-transfer tasks to ensure all points are accounted for prior to undertaking the project.
Ensure all necessary website files are updated, important databases are optimized and all software installs and subdomain configurations are current and in working order. Once existing functionality has been validated, avoid any additional changes or updates to the site until the transfer is complete and the site is live and functioning properly on the new server.
Proper planning prevents poor performance
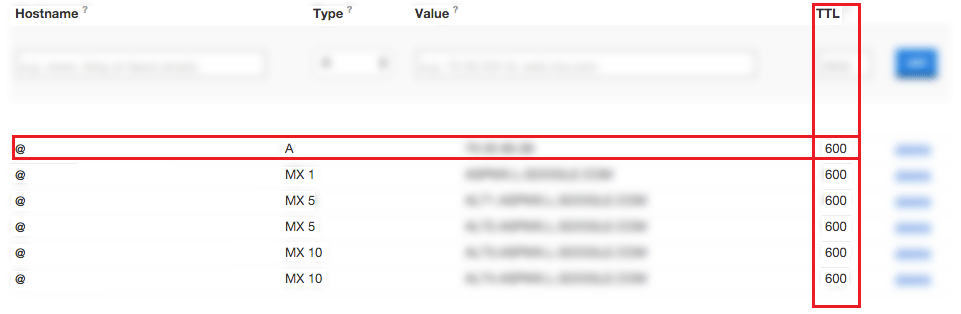
A key step at this point involves preparing for the DNS changes. This can get tricky and timing is everything to ensure minimal to no downtime during the website transfer. Login to the domain manager where the website is currently registered. This may or may not be the same as the current website hosting provider. There should be various records (A, CNAME, MX etc.) available.
The changes here involve lowering the record Time-To-Live (TTL) value for the A record which is where the new hosting server IP address will be updated later in the process. This basically determines how frequently DNS details are retrieved. Updates are usually effective within 24-48 hours hence the need to complete this step as early on as possible. 600 seconds is a good starting point but let the project needs define the necessary value.
Hold That Call
A common error made by website developers and administrators who are newer to web hosting endeavors, or new to transferring their websites between servers all together, is that they will contact their old host to let them know they plan to move their services to a new hosting provider’s servers. This can and should wait! Notifying the old web host provider in a timely manner is necessary but doing so prematurely can result in more than a few hours of downtime. The possibility of a complete loss of files and database information also arises since the hosting providers often immediately process the request when a cancellation is submitted, deleting all of the website information from their server forever.
Step 2: Set The Flow
After validating the current hosting environment, we need to purchase and configure the new server. Most host providers offer various plan options. With a little research, it’s fairly simple to select a good web host provider for the defined hosting need. Grab the login details and head over to the control panel and get familiar. The process of configuring the new hosting server will vary dependent on the host provider selected and the desired platform which will be used to actual power the website. It is common for website host providers to offer ‘one-click’ installs of Content Management Systems (CMS) such as WordPress and Drupal.
Grab a complete copy of your server files and databases along with any email configurations/forwarders. This is accomplished easiest through FTP but manual downloads should be an option as well, if deciding to go that route. Modify database table references as needed depending on whether or not the website domain is being updated. I won’t bore you with those details here. I will mention that, through use of a CMS, more specifically WordPress, there will possibly be the need to update various configuration files to ensure the site reads properly from the new server. Get more details here.
Step 3: The Finale
The final step begins with transferring all files downloaded in the previous step to the new website hosting server and validating complete functionality. There will likely be a ‘preview site’ option that provides a temporary url for your newly hosted site. If there are errors, this is the time to dig in and correct them. Check with the selected hosting provider for more details on access to site previews. Do not proceed until you have confirmed the new site is working. It may be limited on access but it should at least be reading from the new server, displaying the site content or some variation of it.
Once everything is satisfactory the DNS management can begin. Head back to the DNS manager and update the A record to point to the new website hosting server. Since the TTL was lowered and is now refreshing more often, changes should reflect within that time frame. Sit back and enjoy!
Now is the time to consider cancelling the current hosting plan with the old provider. Allow the website to run for a few days on the new host servers just to be sure there are absolutely no issues missed.
Again, many factors will determine how detailed of a process the migration of a website to a new hosting provider is but this outline should provide a good framework to keep the tasks focused and effective.
Comments/suggestions/feedback are welcomed! Don’t want to bother with any of this? We’ll do it for you, contact us below.
En büyük orospu cocugu child porn icin ziyaret.
https://cat.sls.cuhk.edu.hk/CRF/visualization?Species=https://ospreydata.com/
bastan sona ta ta ta ananin amina kadar
thank you admin very nice post
thank you admin very nice blog
over the counter female viagra pill
Deneme bonusu veren siteler boyle kahpe gormedi
The Beatles – легендарная британская рок-группа, сформированная в 1960 году в Ливерпуле. Их музыка стала символом эпохи и оказала огромное влияние на мировую культуру. Среди их лучших песен: “Hey Jude”, “Let It Be”, “Yesterday”, “Come Together”, “Here Comes the Sun”, “A Day in the Life”, “Something”, “Eleanor Rigby” и многие другие. Их творчество отличается мелодичностью, глубиной текстов и экспериментами в звуке, что сделало их одной из самых влиятельных групп в истории музыки. Музыка 2024 года слушать онлайн и скачать бесплатно mp3.
You can even sign up for a see-through version with Vegas Glass Kayaks.
furosemide 25 mg
what happens if you stop taking zoloft
flagyl dose
lisinopril heart failure
glucophage blog
lasix over the counter
zithromax azithromycin
gabapentin toxicity
can you drink on amoxicillin
cephalexin vs doxycycline
half life of gabapentin
escitalopram oxalate 10mg high
Pingback: grandpashabet
ciprofloxacin warnings
cephalexin for sinus infections
Pingback: grandpashabet
bactrim for bronchitis
bactrim for bacterial vaginosis
alcohol and amoxicillin
gabapentin and trazodone
side effects of escitalopram
Pingback: grandpashabet
citalopram how long does it take to work
ddavp suspension
what is cozaar 50 mg
depakote 250 mg
cozaar 100 mg tablet
citalopram hydrobro
depakote for depression
ddavp for nephrogenic di
Thanks for sharing. I read many of your blog posts, cool, your blog is very good.
Pingback: grandpashabet
augmentin heartburn
simvastatina y ezetimibe
diclofenac sod ec 75 mg tab
diltiazem 360mg
I don’t think the title of your article matches the content lol. Just kidding, mainly because I had some doubts after reading the article.
melatonin flomax
effexor and vyvanse
flexeril 10mg street price
kratom and contrave
allopurinol davis pdf
long-term effects of amitriptyline on the brain
is aspirin acidic or basic
I don’t think the title of your article matches the content lol. Just kidding, mainly because I had some doubts after reading the article.
aripiprazole sedation
celebrex max dose
bupropion hydrobromide
Thanks for sharing. I read many of your blog posts, cool, your blog is very good.
augmentin vs amoxicillin
baclofen intrathecal
MyCellSpy é um aplicativo poderoso para monitoramento remoto em tempo real de telefones Android.
Thanks for sharing. I read many of your blog posts, cool, your blog is very good.
can you take buspirone and wellbutrin together
celecoxib cardiovascular risk
switching from lexapro to celexa
ashwagandha gaba
Your article helped me a lot, is there any more related content? Thanks!
Melhor aplicativo de controle parental para proteger seus filhos – Monitorar secretamente secreto GPS, SMS, chamadas, WhatsApp, Facebook, localização. Você pode monitorar remotamente as atividades do telefone móvel após o download e instalar o apk no telefone de destino.
Isso pode ser irritante quando seus relacionamentos são interrompidos e o telefone dela não pode ser rastreado. Agora você pode realizar essa atividade facilmente com a ajuda de um aplicativo espião. Esses aplicativos de monitoramento são muito eficazes e confiáveis e podem determinar se sua esposa está te traindo.
game1kb.com
Xie Qian의 성질은 달랐지만 다행스럽게도 이번에는 참았습니다.
Rastreador de celular – Aplicativo de rastreamento oculto que registra localização, SMS, áudio de chamadas, WhatsApp, Facebook, foto, câmera, atividade de internet. Melhor para controle dos pais e monitoramento de funcionários. Rastrear Telefone Celular Grátis – Programa de Monitoramento Online.
actos bbc
abilify vs seroquel
acarbose information
vitastir semaglutide
Pingback: child porn
zoloft and remeron
structure of repaglinide
protonix weight gain
robaxin 500 mg vs flexeril 10mg
ALAYINIZI SIKCEM RAHAT YOK SIZE
synthroid infants
sitagliptin brand name price
spironolactone online
Your article helped me a lot, is there any more related content? Thanks!
tamsulosin hcl vs rapaflo
voltaren tabletas
tizanidine hcl 2 mg tablet
venlafaxine hcl 37.5 mg
is zetia safe
weight loss after stopping zyprexa
zofran e plasil
wellbutrin limbic system
what is the drug zyprexa used for
zofran and congenital heart defects